A Simple Guide That Helps You Set up myPOS Go 2 and Get Payments Without Stress
It's much easier to get started with myPOS Go 2 than many people think. This guide explains what you need, how to activate the device, and how to start accepting payments right away. It also discusses typical problems that people run into and how to avoid them so that your setup runs smoothly from the beginning.
What You Need Before Setting up myPOS Go 2
A few necessities must be prepared before the device is turned on. Preparation guarantees that payments can be accepted right away following activation and prevents delays during verification.
The setup process is designed to be quick, but it still requires basic business information and identity checks. Many people appreciate that the process avoids lengthy bank approvals often seen with traditional providers.
Account Requirements and Verification
To activate the device, you need to create a myPOS account online. The process usually takes a few minutes, but verification depends on submitting accurate details.
You will typically need
- Business or personal identification.
- Contact information.
- Basic business activity details.
People on forums often mention that verification moves quickly compared to traditional providers. However, delays can happen if documents are unclear or incomplete, so it helps to double check everything before submitting.
Understanding the Free Merchant Account Setup
One of the key parts of the setup is the free merchant account included with the device. This account acts as the central hub where payments are received instantly.
Instead of linking to a traditional bank during setup, the account provides its own IBAN and supports multiple currencies. This removes a common barrier many small businesses face when trying to get started with card payments.
Step-by-Step Process to Activate myPOS Go 2
Once the account is verified, activation becomes straightforward. The device is designed to work independently, so there is no need to connect it to a phone or external system.
Connecting the Device and Network
After unboxing, the first step is powering on the device and connecting it to a network. The device includes both Wi Fi and a built-in SIM card, which allows it to work almost anywhere.
Steps usually include:
- Turning on the device
- Selecting Wi Fi or using the pre-installed SIM
- Logging into your account
People often highlight how convenient the built-in connectivity feels, especially for those working on the move. It removes the need to rely on a separate internet source.

Linking Bank and Payment Settings
After connecting, the system prompts you to link your account settings. This includes choosing how you want to access funds and configuring payment preferences. Payments are processed instantly into your account, which means there is no waiting period. Many users value this feature since it improves cash flow, especially for small or seasonal businesses.
How to Accept Your First Payment Smoothly
Once setup is complete, the device is ready to process transactions. The interface is simple, but understanding the flow helps avoid small mistakes during the first few payments.
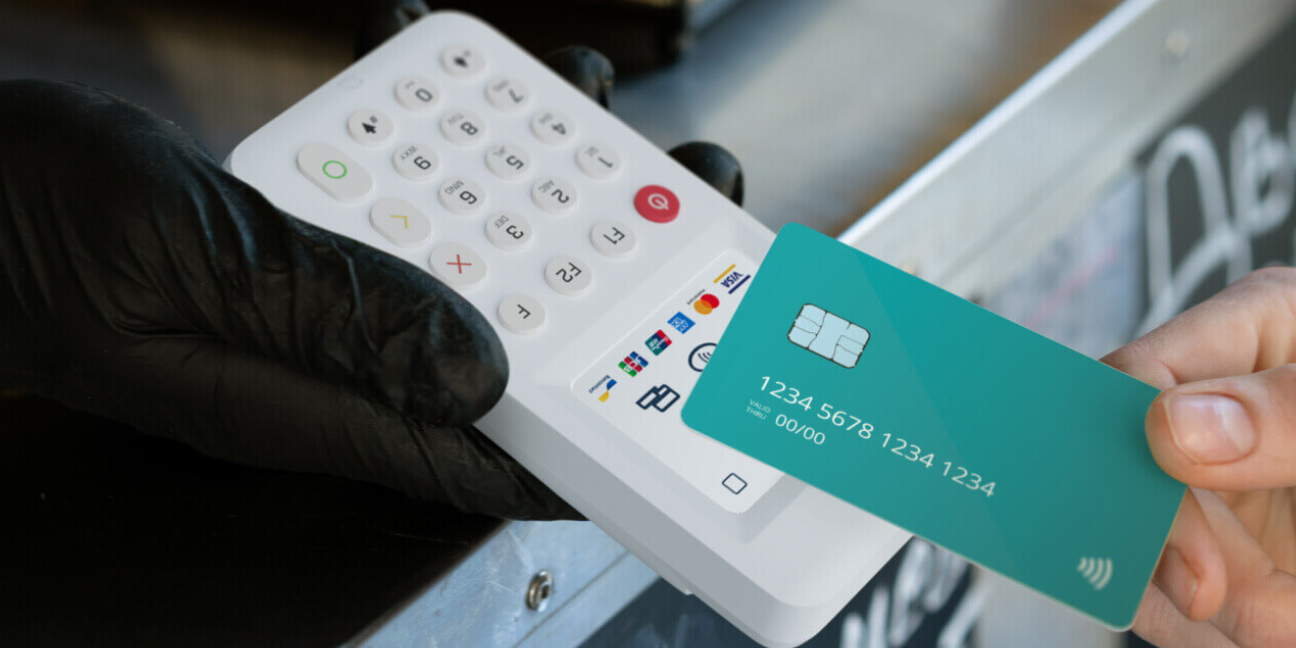
Card Payments and Contactless Transactions
The gadget accepts a wide variety of payment options, such as mobile wallets, chip and PIN, and contactless. This flexibility makes it suitable as a portable card payment machine for different business types.
To accept a payment
- Enter the transaction amount.
- Ask the customer to tap or insert their card.
- Wait for confirmation on the screen.
People often mention that transactions feel quick and responsive, even in busy environments like taxis or pop-up shops.
Receipts and Payment Confirmation
Receipts are handled digitally, which keeps the process efficient. After each transaction, you can send confirmation through email or SMS directly from the device. This approach reduces the need for paper while still providing proof of payment. It also helps businesses maintain a simple and organized record system.
When to Use Virtual Terminal Card Payments Alongside the Device
While the device handles in-person payments, there are situations where remote payments become necessary. This is where virtual terminal card payments can complement the setup.
For example, service-based businesses often take payments over the phone or after completing a job. In these cases, a virtual pos terminal allows transactions without requiring the customer to be physically present.
Combining both methods creates flexibility. The device handles face-to-face interactions, while the virtual option supports remote or delayed payments without disrupting workflow.
Common Setup Issues and How to Avoid Them
Even though the process is simple, a few common issues appear during setup. Knowing them in advance helps avoid unnecessary frustration.
Confusion over connectivity is one problem that people bring up. Some people repeatedly attempt to switch networks without realising that coverage is already provided by the integrated SIM. This is typically resolved by sticking to one reliable connection.
Another concern involves verification delays. This often happens when documents are blurry or incomplete. Uploading clear images and matching details exactly with official records helps speed things up.
Offline mode also raises questions. The device can process payments without the internet, but these transactions carry risk. Payments may fail later if funds are unavailable, so it is best used only when necessary.
Frequently Asked Questions
How Long Does It Take to Set up myPOS Go 2?
The majority of setups are finished in a single day. Verification may take a little longer, depending on the accuracy of the documents, but account registration only takes a few minutes.
Does myPOS Go 2 Require A Smartphone to Work?
No, the device works independently. It connects through Wi Fi or its built-in SIM card without needing a phone.
Can Payments Be Received Instantly after Setup?
Yes, after transactions are finished, money is usually available in the account in a matter of seconds.
Is the Free Merchant Account Really Free?
There are no monthly fees for the account itself. Costs apply only per transaction, which many small businesses find easier to manage.
What Happens If There Is No Internet Connection?
The device can store transactions in offline mode. However, payments are only confirmed once the connection is restored.
Setting up a payment system often feels like a barrier, but MyPOS Go 2 simplifies that process in a way many businesses find practical from day one. With fast activation, built-in connectivity, and immediate access to funds through MyPOS, it fits naturally into daily operations without adding complexity.
If you are planning to purchase, it is worth checking the available myPOS Discount Codes before getting started.
For more practical business insights, make sure to follow TheSmartUse and stay updated.
Comment:
Your email address will not be published. Required fields are marked *